Monday, 21 February 2011

Workshop 4

Sadly we had no more workshops left with Richards input and so were left to our own devices. This workshop consisted of an hour and a half of working on our techniques then the remaining time was spent with a photography technician who explained the basics.
 This was another attempt at a similar technique to the one Richard had introduced to us and i'd researched through Daniel Grein.


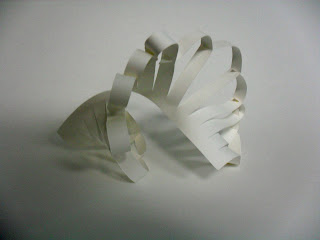
 I continued experimenting with a similar technique and then also incorporated techniques Richard introduced from the first few workshops into one design. I joined at the back using a think piece of card to tie, I really loved this effect and again it's another area I feel i could develop. I'm just a little unsure, because there are no distinct edges how i could join the repeated designs in an organised way.

 Again working with the same technique, just curled the paper instead of cutting, this is a lot more plain compared to the previous idea but i like how delicate it looks.

Daniel Grein

Daniel Grein's work I feel is quite similar to some of the techniques Richard showed us so I found it really helpful to look back at as a reference, I know that if this is a technique i'd like to take forward i'd really need to pay more attention on keeping the lines, cuts and joins more clear.


I really like the style of these pieces and hope to practice the technique more.

Bert Simons

Bert Simons is a designers work that I looked into, his work varies quite a bit and I began obviously by looking into his paper sculptures, his portraits which are so realistic I found really inspirational. Although not directly linked into the project I'm amazed at how he can create something so accurate.

I looked at Bert's other pieces and came across some of his furniture and prototypes, this piece in particular reminded me of the cutout piece i'd made in the previous workshop


Sunday, 20 February 2011

Workshop 3

During the third workshop Richard introduced a couple more techniques to us but by this point it was really a chance to develop what we had already learnt. I was still interested in trying out new techniques to develop though so I carried on working on some of the new ideas Richard showed us instead.
 I created this piece using cut outs of a curved triangular shape, then using the excess edges as the joins, I was quite please with the outcome and would like to experiment with smaller triangles and more faces.
 I twisted and curved the remains of my template paper I had left but didn't have much success with turning it into anything, it does remind me a bit of a butterfly cocoon though

This was another technique Richard showed us, I thought it would be an interesting idea to try and make mini versions, this was a really bad idea it was so fiddly I couldn't even complete it into a sphere, i'd definitely like to look at this again in a larger size.

Saturday, 19 February 2011

Helen Musselwhite

Helen Musselwhites designs are so colourful and quirky she is one of my favourite designers i've come across. Her designs seem to surround the same themes, mainly nature and animals and i've also seen the odd piece with typography incorporated into it.

I like how the images are layered into other images here, the bold lines create a distinctive feel yet the theme of natures gives a delicate feeling
This piece is quite different to the rest as no colour is used, I think it works really well though and the leafy border reminds me of a framed picture.

These two are by far my favourite pieces, I love the patterns and textures used and the use of colour compliments the design really well.


Jen Stark

Jen stark is another designer I came across, I love how colourful her work is and she also uses a lot of repetition.
The repetition of layers in this piece I think creates a floral looking design the idea is really simple but the outcome is complex and interesting.


Here's another piece created using layers, this one reminds me more of an optical illusion and I really like the soft pastel colours that are used. The layering creates a lovely 3 dimensional outcome.
This is probably my favourite piece, I love how it looks like its coming out from the ground and again the use of colour is really effective. I think the sharp curved edges create a striking design which looks like it would have taken a very long time.

Workshop 2

In the second workshop Richard introduced us to some new simple techniques, he then set us a task, we had to fold an a piece of paper in half and then cut sections down the centre and experiment with the outcome.

This activity produced some interesting ideas to continue with, I began initially by twisting the paper which developed a shell shape similar to what i'd been working with last week.
 I continued trying to roll the paper but came out with the same sort of sea shell shape. The image below was just an idea caught by chance and reminded me of waves.
 Next I tried twisting the paper in an uncontrolled way, I really liked the outcome of this, it was just a struggle to get it to stay in a similar shape without holding it, it would be really tricky to try and fix it permanently in this position


 After i'd finished fiddling about with twisting the paper I began trying to compact it, this is another one of the outcomes I really liked. The images below remind me of sculpture like forms.


Thursday, 17 February 2011

Peter Callesen

I came across Peter Callesen's whilst researching for inspiration, it amazed me how he could make such delicate detailed designs as i'd been getting stressed over simple ones.
I love how his ideas come from 2d but are then fixed into 3d.
Even the repetition in the ribs is an idea I think could be used.

Workshop 1

We were lucky enough to have Richard Sweeney come in and give us a workshop surrounding his paper designs. I never knew you could actually be so creative with paper folding, his work is unbelievable.

The first workshop was really all about an introduction into what richard does, we were given a5 sheets of paper and asked to experiment with cutting and folding, we were not allowed to use any form of fixative. This was a lot trickier than it first sounded as we could only join using slits in the paper.
I struggled with this part as i couldn't picture how or what I could form.

Richard next showed us some simple techniques to try, I enjoyed this a lot more.
I cut the paper in equal strips and then fixed it together using slits in the paper. This was so fiddly! It took ages to get it to stay in one place. Experimenting with this technique reminded me a lot of the formation of shells. I definitely think this is an area I would like to experiment with further.

I created a quick background using a2 paper and snapped some pictures of my outcomes.


I took photos at different angles to emphasise the curves and lines of the paper

 This design in particular reminded me of a sea shel